Make Solar Eclipse Glasses
How to Make Your Own Solar Eclipse Glasses: Here is a step-by-step guide — Solar eclipses are mesmerizing celestial events , that capture the imagination of people around the world. While witnessing a solar eclipse can be an awe-inspiring experience, it’s essential to prioritize safety when viewing such events. This is where solar eclipse glasses come into play. In this article, we will explain step by step how to make our own solar eclipse glasses instead of ready-made Solar Eclipse Glasses. Yes, our topic is: How to Make Solar Eclipse Glasses?
What is a Solar Eclipse ? — These phenomena occur when the moon passes between the sun and the Earth, casting its shadow on our planet and temporarily blocking out the sun’s light. It is a spectacular event, but because of the difficulty of looking directly at the sun and the damage it can do to our eyes, we need special equipment to watch the solar eclipse : Solar Eclipse Glasses or Solar Eclipse viewers…
What is a Solar Eclipse Glasses? — Solar eclipse glasses are specially designed eyewear that allows you to observe the sun during an eclipse without risking damage to your eyes. They contain special filters that block out harmful ultraviolet and infrared radiation, as well as intense visible light, making it safe to look directly at the sun.
The rarity and excitement surrounding solar eclipses often lead people to seek out ways to experience them firsthand. Making your own solar eclipse glasses not only adds to the anticipation of the event but also provides a fun and educational DIY project that can be enjoyed by individuals and families alike .
Materials and Tools Needed to Make Solar Eclipse Glasses :
Before diving into the construction process, gather the following tools and and materials:
- Safety goggles: To protect your eyes while working with potentially hazardous materials.
- Cardboard: For creating the frames of the solar eclipse glasses.
- Solar film: The crucial component that filters out harmful radiation from the sun. If you cannot obtain solar film, you can also use aluminum kitchen foil.
- Scissors: For cutting cardboard and solar film to the appropriate size..
- Glue: To attach the solar film securely to the cardboard frames.
- Tape: An alternative method for securing the solar film to the frames if preferred.
- Ruler: In our description, dimensions are given in inches and cm. A ruler will be useful for both accurate sizing and straight drawing.
- Pencil: To make solar eclipse glasses, you will need to draw the shape of the glasses on the cardboard with a pencil..
- Utility knife: Using a utility knife when carving the inside of the frames makes your job easier.
- Caliper: You will need a caliper to draw rounded corner frames, especially the nose bridge. You will also adjust the size of these elements with the caliper . If you do not have a caliper, you can adjust these corner circles by guessing.
With these materials in hand, you are ready to make solar eclipse glasses. But first, let’s ensure you have the perfect workspace for the task.
♦ Step 1 : Prepare Your Workspace to Make Solar Eclipse Glasses
Creating solar eclipse glasses requires precision and attention to detail, so it’s essential to set up a suitable workspace. Choose a clean and well-lit area where you can comfortably work without distractions. A sturdy table or desk is ideal for laying out your materials and providing a stable surface for crafting.
Before you begin to make solar eclipse glasses, take inventory of all the materials you’ll need for the project. Lay them out in front of you to ensure nothing is missing, and familiarize yourself with their locations for easy access throughout the process.
By preparing your workspace and gathering your materials, you’re setting yourself up for success as you embark on the exciting journey of making your own solar eclipse glasses . With everything in place, it’s time to move on to the next step : crafting the frames.
♦ Step 2 : Cut the Cardboard Frames
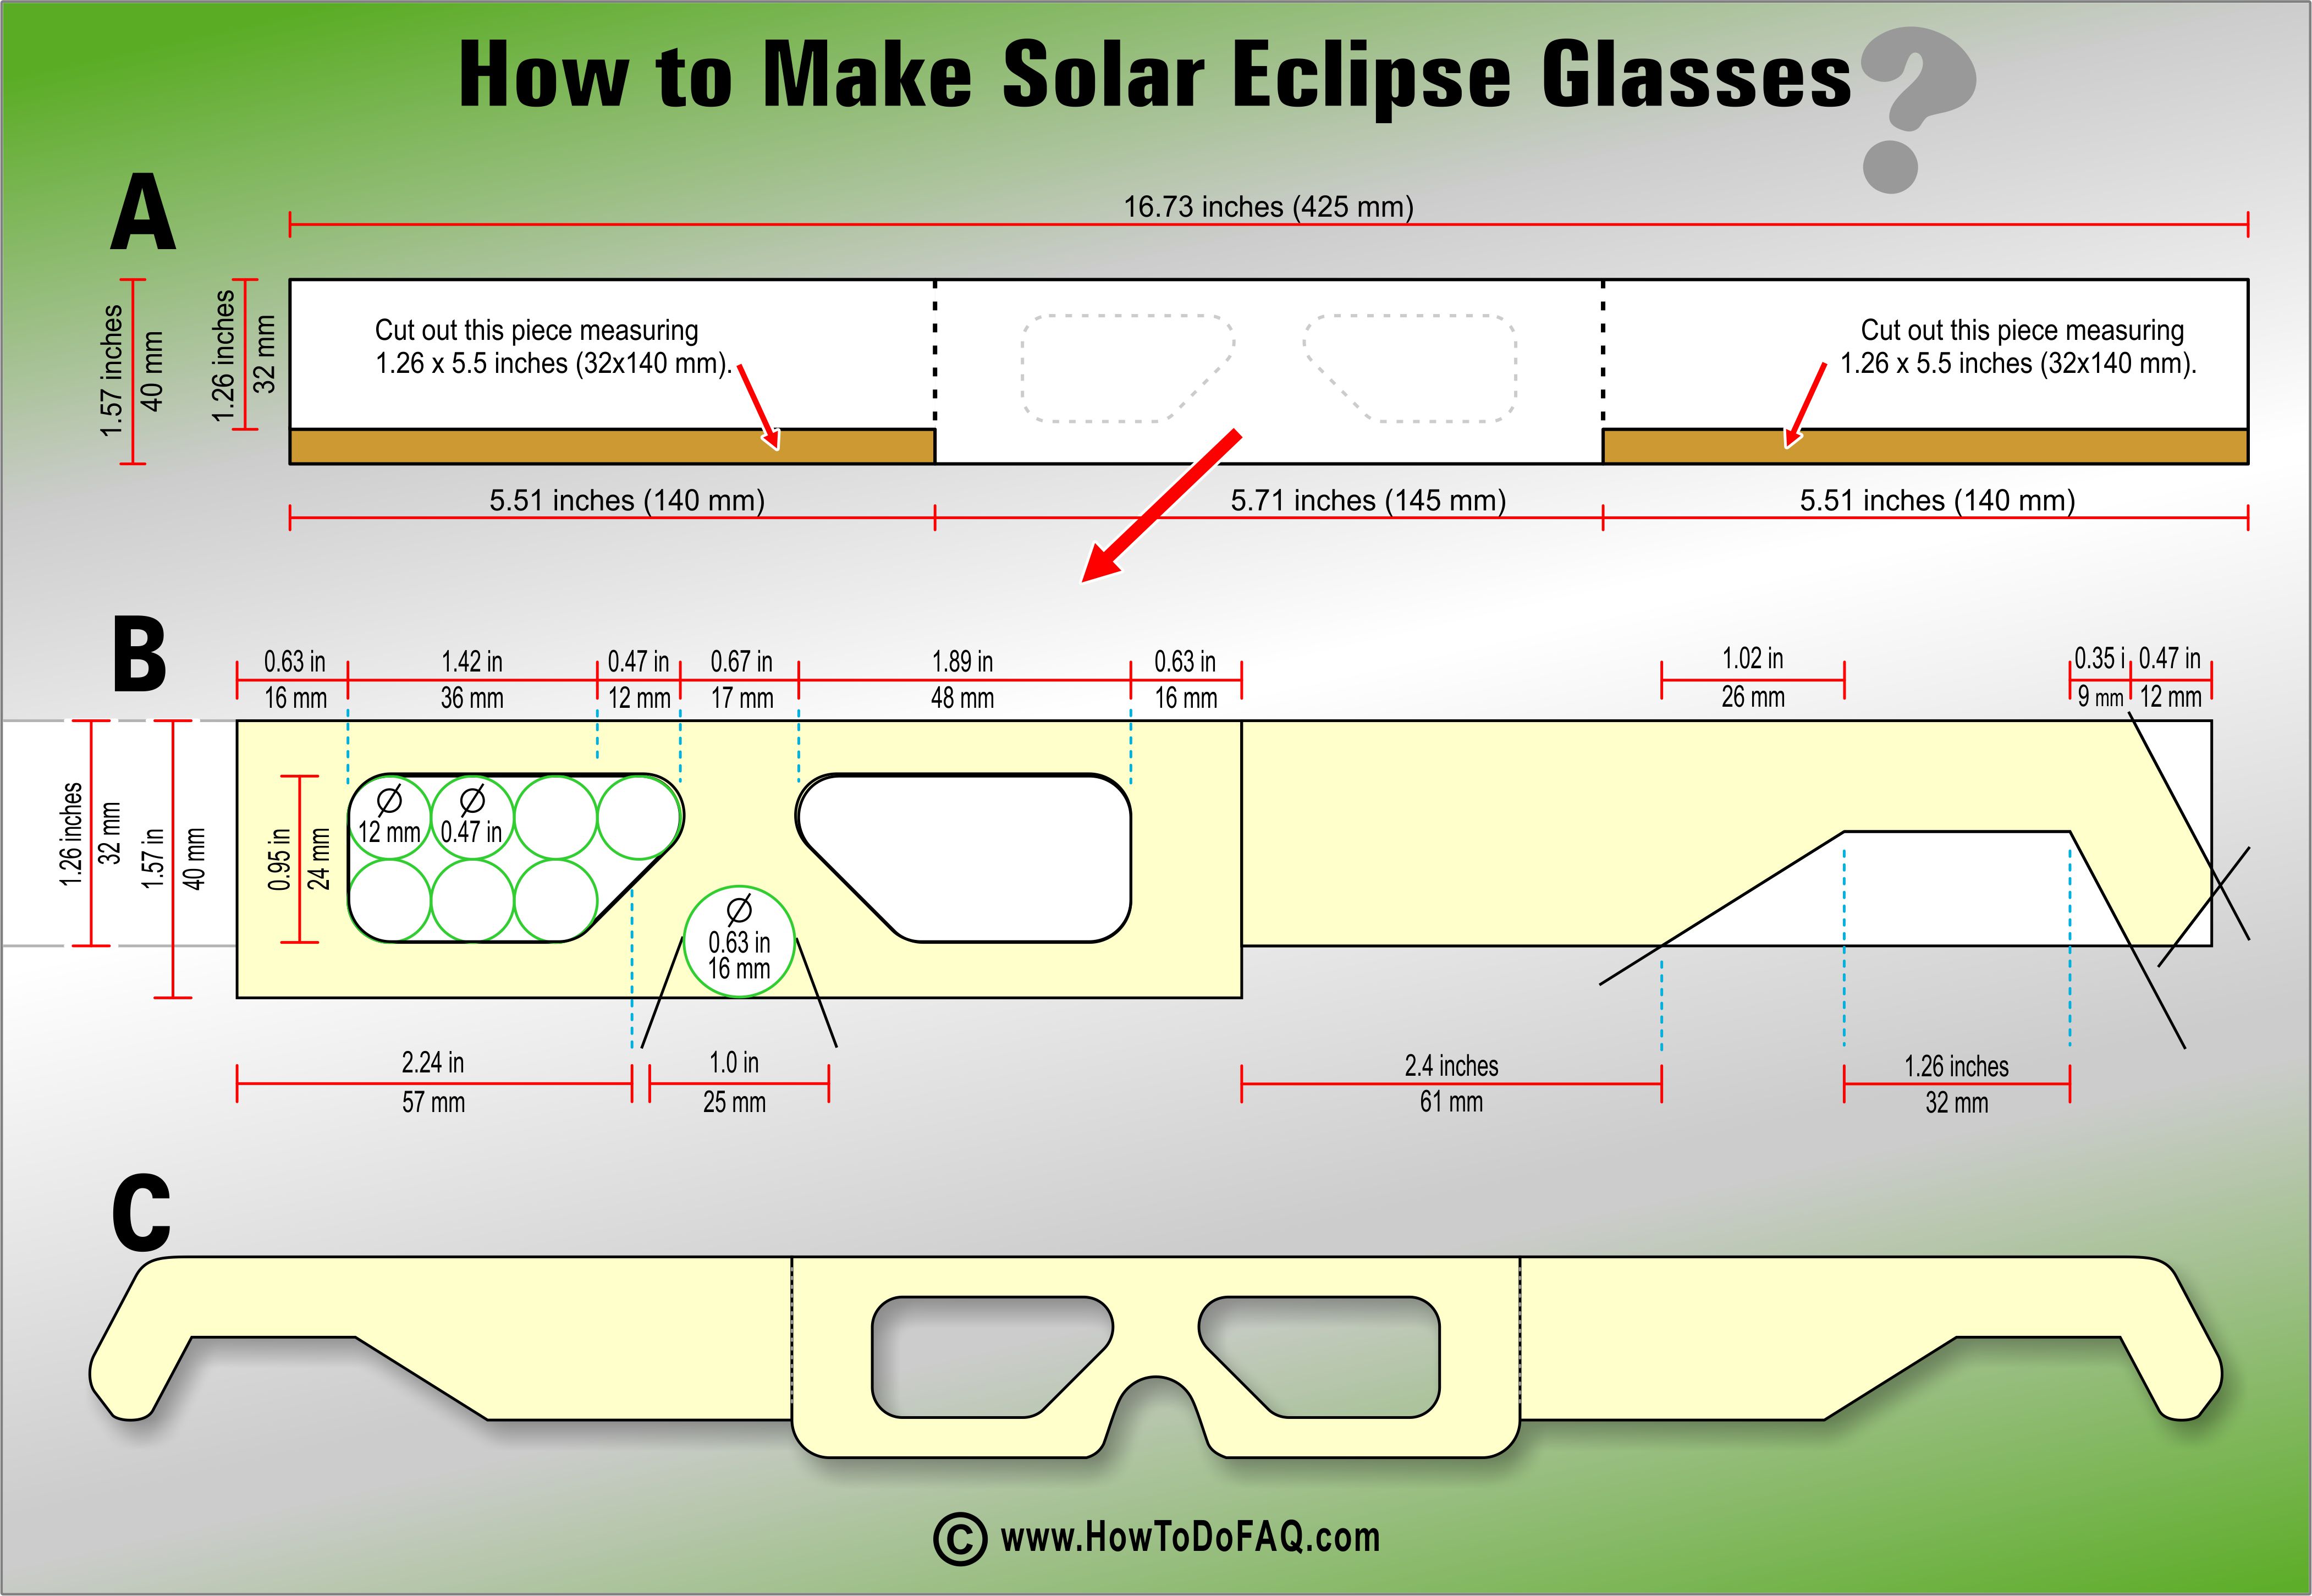
To begin crafting your solar eclipse glasses, you’ll first need to create the frames that will hold the solar film in place. Follow these steps to cut the cardboard into sturdy, rectangular frames. This stage is the most important stage for making solar eclipse glasses. That’s why we chose to explain it with pictures instead of just writing it. Do not start work before thoroughly examining the picture below and understanding what to do. Also, be sure to follow the order of operations as stated here. If you want, you can view the larger version by clicking on this image.
- First, cut two pieces of cardboard (16.73 x 1.57 inches) according to the dimensions in the picture (A). To do this, you will need to use a ruler, pencil and scissors.
- Then, take one of the cardboards and make drawings and markings according to the dimensions shown in part B of the picture.
- The middle part is the part where the glasses frames are located. Using a caliper, draw 7 small circles, starting 0.63 inches (16 mm) from the outside edge of the frames section. Repeat the same process for both frames. Next, create a quadrilateral connecting the outer points of these circles.
- Draw a circle with a diameter of 0.63 inches (16 mm) in the middle for the bridge of the nose. The bottom edge of this circle should touch the bottom edge of the cardboard. Next, create a 1-inch expansion bell on the bottom edge of this circle. During all this drawing, pay attention to the measurements mentioned in the picture .
- To use your solar eclipse glasses by wearing them on your ears, draw arms on both ends of the cardboard. You can do this easily by paying attention to the dimensions specified in the picture.
- Now take the scissors and carefully cut along the marked lines using a pair of scissors or a utility knife. Take your time to ensure precise cuts and smooth edges. Sturdy frames are essential for securely holding the solar film in place during viewing. Cut out the bridge of the nose and the arms of the glasses on the drawing you made, as seen in the picture. Using a utility knife to carve the inside of the frames may make your job easier.
- After the cutting process is completed, pull the second piece of cardboard you prepared at the beginning (16.73 x 1.57 inches) in front of you. Place the first cardboard you have cut on the second cardboard, draw the same shape on the second cardboard by moving the pencil around it and cut it carefully. Now, you have two pieces of cardboard cut into the shape of glasses.
By following these steps, you’ll create robust cardboard frames that provide a stable foundation for the solar film . Now , it’s time to move on to the next step: attaching the solar film securely.
♦ Step 3 : Attach Solar Film, The Most Important Material to Make Solar Eclipse Glasses
With the cardboard frames ready, it’s time to add the crucial component that will allow you to safely view the solar eclipse: the solar film. Follow these instructions to securely attach the solar film to the frames. You will glue the solar film to the frames of the first cardboard from the “back”, please make your preparations accordingly.
- Cut the Solar Film: Carefully measure the dimensions of the cardboard frames and use scissors to cut the solar film to fit. It’s essential to cut the solar film slightly larger than the frames to ensure full coverage and effective blocking of harmful solar radiation .
- Apply Glue or Tape: Place the cardboard frames on a flat surface with the inner side facing up. Apply a thin, even layer of glue along the inner edges of the frames, ensuring complete coverage. Alternatively, you can use tape to secure the solar film to the frames by carefully aligning the edges and pressing them firmly in place.
- Attach the Solar Film: Gently place the cut piece of solar film onto the glued or taped surface of the cardboard frames , ensuring it is centered and evenly positioned. Press down firmly along the edges to secure the solar film in place, taking care to avoid wrinkles or air bubbles.
- Handle with Care: Solar film is delicate and can easily tear or become damaged if mishandled. When attaching the solar film to the frames, handle it with clean, dry hands to avoid transferring oils or dirt that could affect its effectiveness. If the solar film becomes wrinkled or damaged during the attachment process, cut a new piece to ensure optimal viewing quality.
- It’s time for the second carton: After adhering the solar film to the back of the first carton, glue the second carton to the back of it , along the first carton. So, you have a sturdy pair of glasses made of two layers of cardboard, and the solar film is securely held between these two layers of cardboard.
- Giving the Glasses Their Final Shape: Now it’s time to give your glasses their final shape. Round the sharp cardboard corners on the glasses arms, nose bridge and lower corners of the frames with scissors . For this, carefully examine image C in the picture.
By following these steps and handling the solar film with care, you’ll ensure that your homemade solar eclipse glasses provide safe and clear viewing of the upcoming celestial event. With the solar film securely attached to the frames , your glasses are now ready for testing and final adjustments before the solar eclipse.
♦ Step 4 : Reinforce and Seal
After assembling the cardboard frames and attaching the solar film, it’s essential to reinforce and seal your solar eclipse glasses to ensure their durability and effectiveness. Follow these tips to strengthen your glasses and prevent any light leakage:
- Reinforce the Frames: Inspect the cardboard frames for any weak spots or areas that may need additional support. If necessary, reinforce the frames by adding layers of cardboard or tape along the edges. This will help ensure that the glasses hold their shape and provide sturdy protection during viewing .
- Seal Any Gaps or Edges: Carefully examine the seams where the solar film meets the cardboard frames. Use tape or additional glue to seal any gaps or edges to prevent light from leaking through. Pay close attention to the corners and edges, as these areas are more prone to light leakage.
By reinforcing the frames and sealing any gaps or edges, you’ll enhance the durability and effectiveness of your homemade solar eclipse glasses , providing you with a safe and clear viewing experience during the upcoming celestial event..
♦ Downloading the Ready Drawing
If you feel that you will have difficulty in doing the drawing processes described above and you have a printer, we also offer you an easier method.
By clicking on the picture (D) below, you can download the glasses drawing we have prepared in full size. If the image downloads in webp format and you want to convert it to png format, you can use the following website: Webp-to-Png. After printing this drawing, which is also colored , on the printer, glue it to a cardboard and cut out the outlines.
Then, prepare a second cardboard in the same way and make two-layer cardboard glasses as described above. Do not forget to install the solar film as stated in the steps above .

■++